Zero Waste: Cloth Diapers

Zero Waste: Cloth Diapers

Originally, I planned to write about my experience with cloth diapers as a part of my “Simplifying Parenting” series; however, I realized that cloth diapers are not exactly simple. That’s not to say you shouldn’t choose them. Even after seven years of using cloth diapers non-stop for my four kids, I have nothing but good things to say about them. They are zero waste, wallet friendly, helpful for potty-training, more efficient, gentler on baby’s bum, and absolutely adorable.

But I’m definitely no expert, as you will see. I’m just a mom who wanted to save [at the outset] thousands of dollars and [by the end] the planet – one reusable diaper at a time. So rather than try to give you all the answers, explain the cloth diaper lingo, discuss the laundering process in detail, give my opinions on the preferred inserts, diaper rash cream, and cover brands – I’m just going to tell you my story: how I came to cloth diapers, how I made it work for my family, and what I learned along the way.

But first, let’s get the biggest obstacle out of the way.

First, the truth about parenting and poop

I know a lot of people who considered using cloth diapers but, in the end, decided against it because “it’s gross.” So, I just want to say this now: If you think that disposable diapers will save you from having to deal with poop, I have some bad news. Parenting involves poop. And lots of it. For at least five years of your kid’s life, you’ll be dealing with poop. From the day you bring a baby home, you will be tracking poop, examining the color of poop, maybe even weighing poop. As the baby gets older, you’ll be cleaning poop out of car seats, high chairs, strollers, cribs, and – yes – even off of your hands and clothes. Your baby will have explosive poops that shoot up their backs or down their legs and get everywhere. Then when your baby starts eating real food, you’ll have to wipe poopy butts daily until potty training – and these poops smell awful. Like, so awful you can’t believe your sweet angel produced them. And even if you potty train early like I did [all my kids potty trained at or before 2-years-old], you’ll still have to wipe butts until your kid is old enough to wipe it himself. And there will be accidents. There will be poop in underwear, in beds, and in car seats that has to be cleaned.

Fun fact: I never once had a blowout in a cloth diaper – but the moment I put a disposable diaper on one of my kids, shit would shoot up their back. Cloth diapers = fewer blowouts.

Of course, if you’re a working parent, you may encounter less poop, but there will still be a lot of poop. So, just brace yourself.

If all this talk of poop is making you reconsider having kids, then good. Because there are worse things than poop – like vomit. Last month, my daughter threw up three times on the drive home from vacation. THREE TIMES.

Give me a poopy diaper over vomit any day.

Ok, so now that we’re all on the same page about poop, let’s move on to a few other obstacles…

Other obstacles to cloth diapers

Big expense at the outset. I spent about $250 initially for my cloth diapers, which is less than what most sources told me I would have to spend, but even that was more than necessary. If you don’t have funds available to buy everything you need, just buy what you can and add as you are able.

Important Reminder: Cloth diapers are NOT all-or-nothing.

No way to wash them. I have read that some laundromats won’t allow cloth diapers, which is why people without washing machines often choose not to cloth diaper. Of course, it’s hardly fair that those who would benefit most from the cost savings of cloth diapers are limited in this way. As the world continues to encourage more sustainable living, we will need to pressure businesses to make a way for these services. However, there are laundering services for diapers. This depends on where you live, but it is worth looking into for anyone who can’t [or doesn’t want to] wash the diapers themselves.

Childcare won’t use them. This is becoming less and less of a problem as cloth diapers become more common, but the only way things change is by encouraging them to change. If your childcare facility is refusing to use cloth diapers, it’s probably because no one has tried to change this policy. In the end, if a childcare facility won’t support your choice of diaper, you should find a childcare option that does. No reason to pay soaring childcare prices and for thousands of disposable diapers. You could also consider diapering in cloth when you are with your child and using disposable for childcare [and other unwilling sitters/situations].

Important Reminder: Cloth diapers are NOT all-or-nothing.

Now, let’s talk about why to choose cloth diapers…besides that they are so cute.

Why Cloth Diapers [and why your motivation matters]

Cloth diapers are popular because they save money. Lots of money. For example, I have spent no more than $350 [not including the laundry detergent and diaper creams] on my cloth diapers [inserts and covers] and diapering supplies [like diaper sprayer, diaper pail, diaper pail liners and wet bags] to diapers all four of my babies. So, if the average family spends $587 per year per child on diapers [totaling $4,696 for four kids potty-trained at 2-years-old], I saved $4,346 by using cloth diapers.

BUT, I did occasionally buy disposable diapers for certain occasions [which I’ll explain later]. Still, my savings is definitely in the thousands. And looking back on it, it has not been a huge inconvenience – even when I was working up to 32 hours a week.

I have loved using cloth diapers – but not because of the money.

When my second born was one year old, and I was pregnant with my third, I began to take the environmental crisis seriously for the first time in my life. That’s when I really fell in love with cloth diapers.

I’ve known many people to chose cloth diapers because of the money, only to quit later when the going gets rough [and it does get rough at times]. Because, in the end, most people with the means won’t find the savings a strong enough motivation.

However, when my motivation revolves around the “greater good” of lower waste and protecting the planet then it’s much more likely that I will make it work – and not even complain about it.

So what I’m saying, basically, is that why you chose to use cloth diapers is really important for your success. And at the very least, think about the big picture benefits before throwing in the towel.

My Cloth Diapering Experience

So, this is basically how I did it…
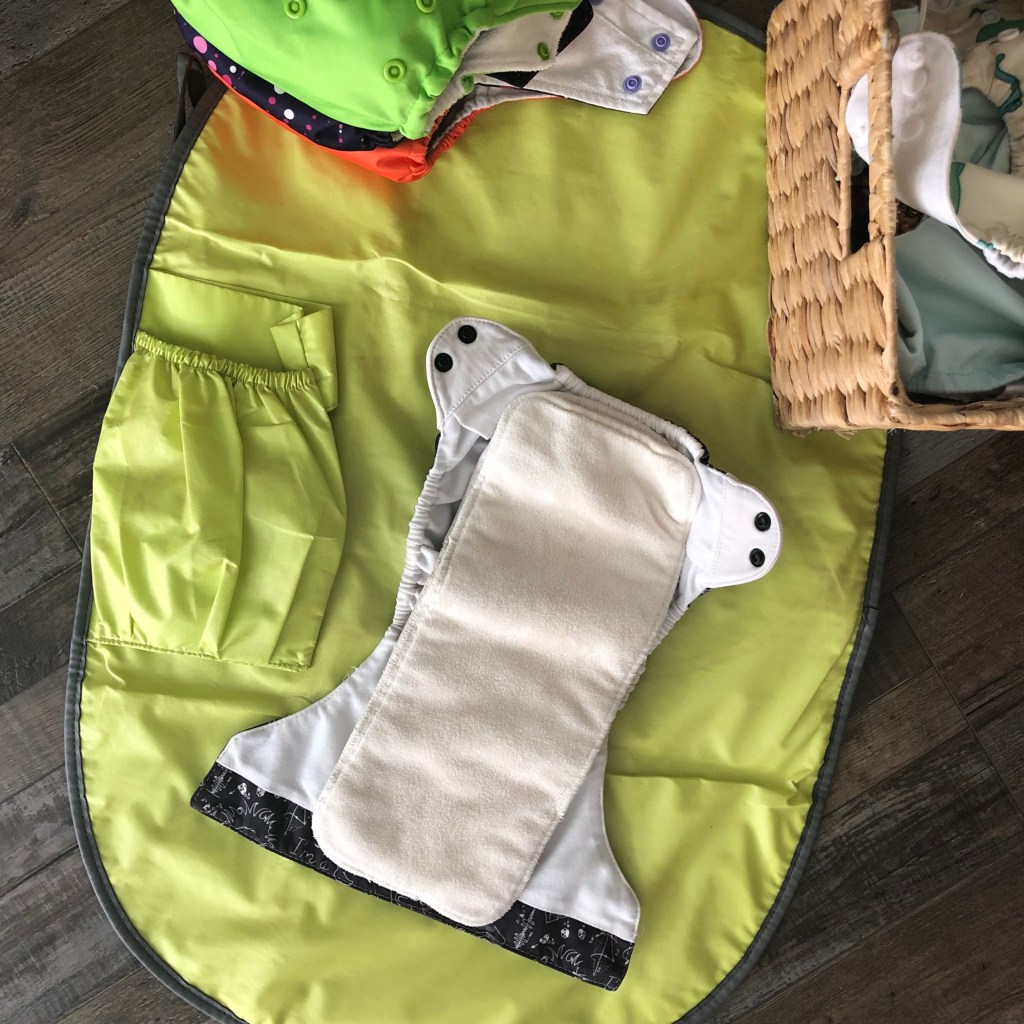
Things I bought:

  • Cloth diapers – I bought them on Amazon in sets with covers and inserts and a variety of brands
  • Diaper pail – I just bought a basic tall trash can with a lid
  • Reusable diaper pail liners – I bought two reusable liners from Amazon, which I still use after 7 years [though the elastic is entire shot on both of them at this point]
  • Wet bags – These are basically waterproof bags to carry dirty diapers in when out and about – I bought three, but two would have been enough
  • Reusable wipes – If I had been smarter, I would have just cut up some old cotton t-shirts for this job, but I wasn’t thinking that way back then.
  • Natural diaper rash cream – two brands that I used for my kids: Earth Mama [previously called Earth Mama Angel Baby] and Grandma El’s.
  • Diaper sprayer – I read somewhere that I wouldn’t need a sprayer because healthy poop is solid and falls out of the diaper. Folks, let me tell you, that is a total lie. Hard poop is not healthy poop. You will definitely want a diaper sprayer.

The only thing on this list I had to rebuy was the diaper rash cream. Everything else, I’m still using for my last baby [who is already potty training – yay!].

Using Diapers:

– My babies were 100% breastfed, so all diapers just went straight into the bin and then it was washed [liner and all] every three or four days.

– After six months, poopy diapers had to be sprayed before going in the bin [don’t procrastinate about this task – trust me], but frequency of changes went down so I could wash every five or six days.

– When going out, I brought a change of diaper, a wet bag, and a few cloth wipes.

– I use inserts, but I never actually put them into the pocket of the cover. I just lay one [for infants] or two [for older kids] inserts on top of the cover and wrap up the baby’s bum.

– On long trips [such as week-long vacations], we would buy disposable diapers because of the convenience while traveling. Also, when visiting certain family members who were less than enthusiastic about cloth diapers we would switch to disposable for the trip.

– On a few occasions we switched to reusable diapers for a rash that needed some more powerful diaper cream while I sorted out the wash issue that was causing the rash.

Washing diapers:

Ok, this is by far the hardest part of cloth diapering and the biggest reason people give up. There is so much [often contradictory] information out there about how to wash cloth diapers. And, in the course of seven years, I’ve done it many different ways.

My advice: keep it simple.

First of all, detergent. I originally bought a special detergent for diapers until I read [and can confirm] that a special detergent is unnecessary. Now I just use the regular family detergent [always free of perfumes and dyes] with no problems.

My wash routine is simple. I do a preliminary wash with little [or no] detergent and cold water, then a heavy duty wash with hot water and a little extra detergent. That’s it.

Note, though, that your washing machine and the hardness of your water make a difference. At my last house, which was on a well with very hard water [and an all-house water softener], I had to add a water softener into the washer with my detergent in order to get the diapers clean. How did I figure that out? With lots and lots of trial and error and reading a gazillion articles online. But if the diapers aren’t washed properly, they will cause diaper rashes. If they don’t smell clean, they aren’t clean and you need to re-examine your wash routine.

In seven years, I only stripped my diapers once [because of the aforementioned hard water incident] and bleached them once [basically because I thought they needed it].

My other piece of advice: Don’t give up.

Drying diapers:

Hang to dry whenever possible. I always always hang dry my covers to preserve the elastic. I usually dry my inserts in the dryer, but that is only because I have always lived in a wooded environment where hanging outside means lots of bugs and bird poop [kind of defeating the purpose].

I have hung my diapers to dry in many places around my house: the basement bar [my partner loved that], the heating vent on the ceiling of the laundry room, and nowadays, the dining room chairs…

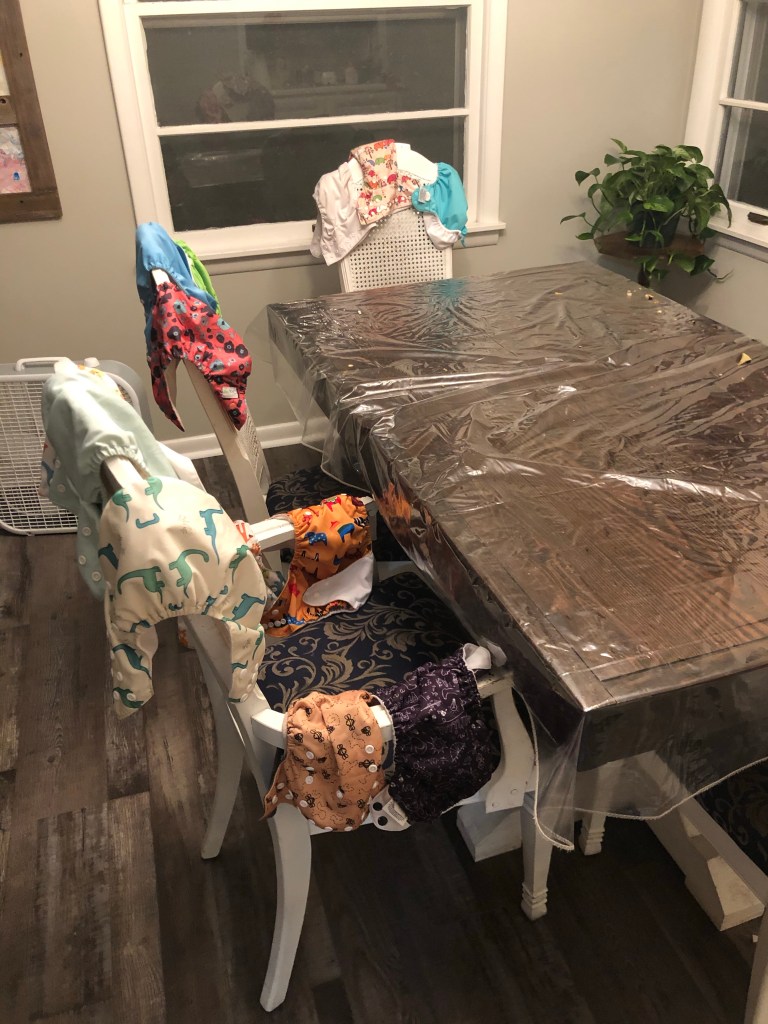
I hang them up before going to bed and they are dry in the morning.

The wash and dry cycles for cloth diapers really aren’t anything to be intimidated by. When it comes to cloth diapers, you’ll want to remember the old saying: “Where there’s a will, there’s a way.” You may want to hang that up in the laundry room somewhere as a reminder.

😜

[If you really want to get into all the nitty-gritty of washing and drying diapers, then I recommend reading Erin Tova’s post How to Wash Cloth Diapers or Fluff Love University’s guides for washing diapers.]

What You Should Know about Cloth Diapers

When I was pregnant with my first baby, I was SO overwhelmed – by everything, but especially about cloth diapers. What kind do I buy? What is a good price? New or used? What brand? How do I use them? How do I wash them? Etc. There is so much information out there that it’s easy to feel overwhelmed.

So, let me just say this: cloth diapering is a “learn-as-you-go” sort of endeavor. Everyone has a different experience, prefers different brands, washes in different ways. That’s ok! Don’t sweat it. Take the plunge. Course correct as needed. And that’s it!

Oh, and always remember that the whole point of cloth diapers is to cover your baby’s bum and catch all the excrement so that it doesn’t get everywhere and make a huge mess. So you could wrap your baby’s butt in a towel, or a t-shirt, or a bandana, or anything that gets the job done. So don’t overthink things.

I’ve had really great experiences with cloth diapers, and I hope that every parent who chooses this route does too. So, if you have any questions, feel free to comment below or send me a message. I’d love to empower more people to choose this zero waste option for their kids.

Happy diapering!

👶🏼 👶🏼 👶🏼

Karis

My Vegan [and Zero Waste] Birthday Celebration

My Vegan [and Zero Waste] Birthday Celebration

This year marks the first birthday that I celebrated as a vegan. After 33 years of enjoying butter cream, milk chocolate, and ice cream on my birthday, this year looked different – but, truthfully, only a little.

Vegan Meal

From all appearances, the meal and dessert were stereotypical American birthday fare. But what you can’t see is the ingredient list, which contained no meat, dairy, or animal products. I wanted to indulge a little bit. [C’mon, it’s my birthday!] But I also didn’t want to overdo it, or compromise my standards for eating healthy, sustainable, and ethical foods. So we had burgers [vegan burgers, of course] and hot dogs for the kids [vegan hot dogs] with home baked buns and a side of salad and French fries.

My birthday dessert was still cake [vegan chocolate chip banana cake] with frosting [vegan cream cheese frosting], which I baked myself because really who would want to bake a birthday cake for me knowing all of my complicated ingredients requirements like organic, fair trade, ethical and sustainable, not to mention vegan [which in itself would be enough to scare away the average person]? Anyway, I love baking, so I wanted to make my own. And this was the first vegan cake I’ve ever made.

I thought it was really yummy.

Zero Waste Gifts

Now that I have been [nearly] zero waste for several years, everyone knows to give me sustainable gifts, which is awesome.

This year, my partner gave me a safety razor which I have been wanting for so long, but was waiting until we used up our stash of disposable razors [don’t even ask why I have such a large stash of disposable razors…]. Now I can donate the rest of my plastic razors to our local compassion center in town and switch over to a more sustainable razor. Even my children and in-laws gave me thoughtful, meaningful, and sustainable gifts like bar shampoo, crochet hooks and yarn to make my own washcloth, a reclaimed puzzle, and wireless earbuds.

My sweet Auntie sent me these beautiful flowers.

And probably my favorite gift this year was from my six-year-old daughter, Evangeline, who asked me to teach her to braid so she could make me this very special bracelet which I love so so much.

And my last bit of personal news: for the first time in exactly one year, two weeks, and four days, I was able to put my hair in a ponytail!

The pony is so small you can’t even see it! 🤣

Anyway, today is also the 3rd birthday of this blog! 🥳 It’s been a great adventure so far, and I’m grateful to all of you for joining me!!

To many more!

🥂

Karis

Simple Vegan Sweets

Simple Vegan Sweets

As a vegan, I don’t miss the meat nearly as much as I miss the sweet stuff: ice cream, brownies, cake, buttercream!

😩

But, don’t worry. I wouldn’t let veganism stand in the way of my sweet tooth. So, today I’m sharing with you my three favorite homemade vegan sweets. These treats are so easy to whip up and only use a handful of natural ingredients.

Vegan dessert options are still pretty rare and/or pricey. So, if I want a vegan dessert, I have to make it myself, unless I want to pay $5 for a pint of dairy-free, calorie-bomb ice cream [which, I’ve definitely done] or some other specialty vegan product. But the truth is, making sweets myself is more rewarding and also free of all the additional junk in processed foods.

These three desserts require very few ingredients and varying degrees of effort. Let’s start with the easy one.

Easy: Vegan No-Bake Brownies

Forgive my terrible photos. I’m clearly not a photographer.

Brownies are pretty much the best things ever baked [in my opinion, anyway], which makes these vegan no-bake brownies the best things ever…not baked. They aren’t an exact replica of a traditional brownie, but they are really frickin’ good! They are nutty, gooey, chocolatey, and that ganache is the perfect sweet topping.

The ingredients for the brownie bit are: walnuts, almonds, dates, cacao powder [or cocoa], and salt. You basically throw everything into a blender under it gets all gooey and then press it into a dish and refrigerate. [I’m oversimplifying a teensy bit, but that’s the gist.] Doesn’t get much simpler [or natural] than that!

[Actually it does get simpler, if you read on to the next recipes, but never mind that for now.]

The ganache has almond milk, dark chocolate chips [I always buy the allergy friendly or certified vegan chocolate chips], salt, coconut oil, and powdered sugar.

The recipe is from the Minimalist Baker, and you can find it here. I don’t change anything, except I once swapped the walnuts for pecans and they were still delicious.

Side note: these are a pricey dessert to make due to the nuts and dates – but totally worth it! They are also high in calories [because nuts have a lot of good fat]. I’m a strong believer in the idea that if I put in the work to make something from scratch, then I deserve to enjoy the fruits of my labor guilt-free. [Though I still limit the quantity.] Whereas, buying an overpriced, mystery-ingredient-filled vegan dessert from the grocery store just isn’t as satisfying.

Easier: Vegan Coconut Macaroons

Forgive my terrible nail polish. I’m clearly not a hand model.

Not to be confused with macarons [which can also be made vegan, but would never, ever by any human being be described as easy], these vegan macaroons are little bits of coconut and chocolate heaven. Of course, I love coconut. If you don’t like coconut, just skip down to the next sweet treat [but know that you’re missing out on all the goodness that coconut products offer to us vegans].

Most vegan macaroon recipes call for aquafaba, which I always have, but never feel like using because it requires all that beating. It’s quite time consuming. I wanted something simpler than that…and I found it.

Over at mindfulavocado.com, Amanda provided a super simple macaroon recipe, which I now use to satisfy all my coconut cravings. You can find the full recipe here, but I did modify this one to make it even more simple. Basically, all I do is mix together sweetened coconut flakes [you could pulse in a blender to make them finer, if you prefer], almond flour, maple syrup, a pinch of salt and enough almond milk to make it come together into a thick “batter” of sorts. Then I spoon it onto my silicone baking mat in little ball shapes and bake them at 275° for about 30 minutes [sometimes longer, check frequently.] Then once they are cooled, I dip and drizzle with melted dark chocolate chips.

That’s it.

And they are so good. Slightly chewy, slightly crispy, with the touch of dark chocolate.

😋

Easiest: Vegan Peanut Butter Cups

I made these for Easter, which is why they are shaped like eggs. Or at least, they were supposed to be shaped like eggs…

No matter what shape you prefer, these are sooooo good. And quite frankly, I don’t know why everyone else puts butter and vegetable shortening in them!!! Why complicate matters when you can make these with three ingredients and like two minutes [excluding freezer time]?!?

So, there is no recipe for these treats – which, by the way, are my absolute favorite. It’s too simple for a recipe.

All you need is peanut butter, powdered sugar, and chocolate chips.

Some side notes about these ingredients:

1. The peanut butter needs to be natural peanut butter. And, by that, I mean that the only ingredient in it is peanuts [and maybe salt] – that’s it! No one should be eating that weird oily smooth peanut butter that Jiff is selling anyway. What the heck is that stuff? It’s definitely not peanut butter. But, anyway, I digress. I make my own peanut butter using peanuts and a blender [Ninja], but you can find a jar of natural peanut butter at the grocery store you just have to read the label. Many jars say “natural” and they still have sugars, oils, and god knows what else in them.

[Ok, sorry about that. I’m passionate about peanut butter.]

2. Chocolate chips should be vegan if you are vegan, but if you are not vegan you can use any chocolate chips you want and you will still LOVE THESE PEANUT BUTTER CUPS! I mean, I have yet to meet a human who doesn’t like chocolate peanut butter cups. [Obviously, a peanut allergy will prevent some people from having these…and I am just so so sorry.]

Now, all you have to do is put some peanut butter in a bowl and mix enough powdered sugar to get a thick-ish consistency [there is no right or wrong here]. Then shape however you want and put in the freezer to harden. Then dip or roll or drizzle or coat in melted chocolate chips. Once set, enjoy!

If even that sounds like too much work, look, just put some peanut butter in a bowl, mix in some powdered sugar, and sprinkle in chocolate chips…then go sit on the couch and watch Netflix. Okay?

Sometimes that’s all I’ve the energy for myself.

🤷‍♀️

No shame in my game.

Footnote about eating sweets:

Now, one last thing. I am an obsessively healthy eater, so you may be surprised to see me promoting sweets. But, the truth is, being healthy does not mean that you can never have dessert again [and being vegan definitely doesn’t mean you have to deny your sweet tooth]. We just have to level up our treats. We need to be eating occasional desserts in reasonable [aka small] quantities that contain natural, and healthful ingredients.

That’s it!

I don’t eat these things every day. Truthfully, I eat a sweet treat about once a week at the most. That’s enough for me to feel like I’m not depriving myself.

Food is fuel, but that doesn’t mean we can’t enjoy it too.

And I hope you do enjoy these recipes! If you try one out, let me know! And you can also tag me in a photo on Instagram @no.makeup.mama – though, fair warning, I’m not on social much.

🍮 🍨 🧁

Karis

The Water Crisis [and my humble attempts to reduce my water waste]

The Water Crisis [and my humble attempts to reduce my water waste]

Most people think of the zero waste movement in terms of refusing plastic bags and disposable straws and fitting your garbage in a mason jar – but zero waste extends beyond just these forms of waste. Yeah, plastic is bad for the planet and filling a fifty-five gallon trash can every week is really bad for the planet, but those aren’t the only forms of waste – they are just the most obvious because they are the kinds of waste we can see.

Another form of waste that we all need to be more mindful of [myself included, but I’ll get to that in a minute] is water waste.

But why is wasting water a big deal? If you live in an industrialized country like the US and water flows freely from every tap in every building, and free water fountains can be found in every business, and a gazillion cases of water bottles are for sale in every store, then it is easy to feel like water is an abundant and readily available resource.

But au contraire.

[Fun fact: I actually grew up in Flint, Michigan, which was all over the news in 2016 for having its own water crisis – proving that the water issues are not only for people in the developing world. Water is a necessity for every human being’s survival and it only takes one bad politician’s stupid decision to bring a water crisis very close to home…literally.]

The Water Crisis

Several years ago, I watched an episode of the Netflix docuseries Explained entitled “The World’s Water Crisis.” Call me ignorant, but I think that was the first time that it really struck me that water is an invaluable resource – and that we may someday run out of it.

[The episode is still on Netflix – I highly recommend watching it.]

Since that time, water has been on my mind. How do we protect this commodity? How do we ensure access for all of humanity? How do we respond to increased demand from industry and agriculture and manufacturing and increased populations? How do we manage the water?!?

Right now, there are over half a billion people on the planet who do not have access to safe water. And unclean water is one of the leading causes of death for children under five in developing countries. And, honestly, with pollution increasing and the population increasing and the global temperature increasing leading to severe weather like droughts – we’ve got to get a handle on this water problem…and FAST.

Here’s some quick stats about the water on our blue planet:

  • 70% of the planet is covered with water, but less than 3% is fresh and less than 1% is fit for consumption.
  • 785 million people on earth don’t have access to safe water. [Charitywater.org]
  • Nearly 1 million people die each year from water, sanitation and hygiene- related diseases. [Water.org]
  • Every day, 6,000 children die of water-related diseases. Young children are the first to get sick and die from waterborne and sanitation-related illnesses—including diarrhoeal diseases and malaria. [UNICEF.org]
  • By 2050, at least 1 in 4 people will likely live in a country affected by chronic or recurring fresh-water shortages. [Worldvision.org]

[Water.org has a great fact sheet with more information on the water crisis here.]

So, what do we do?

Well, for starters, I started supporting Charity:Water as a part of their monthly donor program – called The Spring – that provides clean water to remote and underprivileged communities around the world.

Since we joined in 2019, we have donated/raised more than $9k for clean water projects – impacting 236 people.

That’s pretty awesome.

If you want to help support this organization then you can join me in The Spring by following the link below:

Join The Spring with Karis!

You can donate any amount. Over time, this monthly donation – no matter how small – will add up to lives changed, lives saved, because of clean water.

This is a very simple and tangible way to make a difference in the world.

Two [of the many] reasons [besides what I already shared above] that you should consider giving to Charity: Water:

  1. 100% of donations go to fund clean water projects.
  2. Charity:Water allows you to see exactly where your money is going.

Ok. So anyway, that’s one thing we can all [or mostly all] do to help with the water crisis. The second thing is to reduce our own water waste.

Reducing Water Waste

We all need to take a greater responsibility in the water crisis by conserving water as much as possible to prevent shortages. The people of Cape Town South Africa [in the Netflix documentary] found a way to conserve water in order to push back their Day 0. We should be forward thinking enough to stop wasting water now rather than waiting for doomsday.

For me, reducing water waste is also out of respect for the commodity that it is. Just as I don’t feel comfortable splurging a ton of money on frivolous shit when thousands of children are dying from starvation every day, I also can’t be taking thirty-minute steaming hot showers and running my faucet while doing dishes when I know that there is a kid [most likely a girl] somewhere on the planet who has to walk for hours just to fill a jerrycan of dirty water for her entire family.

And, of course, if you don’t have your own well, saving water will also save you money. So, yay.

So, what do we do?

First, you have to check out this great list compiled by sustainability blogger, Jo, at 43 square meters:

25 Ways to Reduce Your Water Consumption for the Environment and Your Wallet

I’ve already implemented many of these tips, but, as this article proves, there are always more ways to improve!

Some of the things that my family already does to reduce water waste:

  • We wash laundry once a week [except when one of our kids wets the bed] and always with full loads.
  • We bathe our youngest two kids once a week [together] and our older two kids take showers.
  • We turn off the water when we brush our teeth [and are teaching our children to do the same].
  • We don’t buy or eat animal products [except my kids and husband when we are eating out].
  • We have an extremely energy efficient dish washer [apparently only uses a couple gallons of water to run].
  • We buy [nearly] all our clothes second hand.

Still, as part of my New Years Resolution to focus on the water crisis, I’m going to redouble my efforts on reducing my water waste by working on the following things:

  1. Wash fruit and veggies in a bowl rather than running the tap.
  2. Rinsing dishes in a bowl of water instead of running the tap.
  3. Taking shorter showers [this one will be tough].
  4. Getting a rain barrel.
  5. Switch to low-flow shower heads.

So, that’s my game plan for reducing my water waste. At our last home, we lived on a well, so I really had no idea how much water we were using, but since we’ve moved to a house with city water, I am better able to track our water usage [or rather the water company tracks it for me]. Hopefully, I’ll see some improvements in water usage.

There are lots of other things that need to be done about the water issues facing our world. I don’t want to make it sound simple enough that washing my fruit in a bowl of water or donating $100 a month will solve the problem for our future or for the 785 million people currently without clean water, but small changes go a long way, especially if everyone makes them.

Other ideas about reducing water waste? Or suggestions of other organizations working in this sector? Share below!

🚿🚿🚿

Karis

Super Simple Vegan Banana Muffins [and a rant about breakfast cereal]

Super Simple Vegan Banana Muffins [and a rant about breakfast cereal]

A few days ago, I showed off the silicone cupcake liners that I use every Friday when I bake vegan banana muffins.

Read all about it here.

I’m going to share my super simple, go-to recipe for these muffins in just a minute, but first, I feel like I have some explaining to do.

Baking muffins every weekend might make you think I have some strange banana muffin obsession, or maybe I have a banana tree in my backyard. But the truth is simply that I refuse to give my kids cereal for breakfast. [Just bear with me, I’ll explain.]

[If you don’t want to hear my rant about breakfast cereal, by all means, skip down to the recipe below.]

My Rant about Breakfast Cereal

I have a sort of hatred for breakfast cereal.

Of course, I grew up eating cereal [like every other American I know], but when I decided to start eating healthy foods, cereal was the first thing to go. In the past ten years, I have had cereal maybe three times, and each time it made me feel like crap and almost immediately hungry again. So I don’t like giving it to my kids. I also used to preach against it to my personal training clients.

Cereal might not be so bad if we didn’t eat waaaaay too much of it. A serving size for most sugary cereals is 2/3 to one cup. A typical bowl of cereal probably has three or more cups in it! [You can find some great YouTube videos on this topic to see for yourself – or actually do the unthinkable and measure your cereal!] And don’t even get me started on the highly processed, super refined carbohydrates and sugars that make up pretty much the entirety of boxed cereal. Any food that has to make dubious health claims like “may reduce your chances of heart disease” is probably not worth eating – take it from me…and Michael Pollan.

Now, I know what you’re thinking, banana muffins aren’t exactly a healthy breakfast either, vegan or not. And you are correct. But I’ve made the following “deal” with my children because…well, I want them to love me…or at the very least, not hate me.

On weekdays, we all eat oatmeal with fresh fruit and brown sugar. And as a concession [and so I won’t be accused of a being a terribly cruel mother], I make special breakfasts on the weekends: banana muffins on Saturday and pancakes on Sunday. [I still eat oatmeal.] Both special meals usually contain chocolate chips. [No, I am not afraid to use chocolate chips as bribery.]

On the weekends I could give them cereal. But like I said, I hate cereal. Plus, cereal is a slippery slope. It is just too dang easy and convenient.

So, now, on to the recipe.

My Vegan Banana Muffin Recipe

You’ll have to forgive me, but I don’t typically do recipes on this blog, so I don’t even know how to make a “recipe card” thingy.

🤷‍♀️

But here we go anyway….

This recipe is based off “Vegan Banana Chocolate Chip Muffins (Healthy)” recipe from The Simple Veganista which you can read here. I’ve taken this base recipe and modified it to make it simpler [I do this every weekend, ya’ll] and how my kids like it [aka I’ve taken out the word “healthy”].

Ingredients:

  • 3 or 4 ripe bananas
  • 2/3 – 1 cup sugar
  • 2 – 3 tbsp brown sugar
  • 1/4 cup coconut oil (melted)
  • 1 3/4 cup of AP flour
  • 2 tsp baking powder
  • 1/2 tsp baking soda
  • 1/4 tsp salt
  • 1 tsp cinnamon
  • Optional: chocolate chips (as many as you want)

Instructions:

  1. Preheat oven to 350°
  2. Mash bananas in a mixing bowl.
  3. Mix in sugars and coconut oil.
  4. Add the rest of the ingredients to the bowl and mix until just combined.
  5. Scoop into muffin tin [or muffin liners] until 3/4 full.
  6. Bake for 20-25 minutes. [Mine are always done at exactly 22 minutes.]

And that’s it!

I love this recipe because it doesn’t require any funky vegan stuff like flax eggs or vegan butter or even non-dairy milk. Of course, I usually have all these things on hand anyway, but this is a totally accessible recipe for everyone and [dare I say it] it’s even better than any traditional banana muffin recipe I have ever made. Even Brett said so!

Give it a try and let me know if you agree!

Happy Baking!

👩‍🍳 👩‍🍳 👩‍🍳

Karis

Zero Waste: Silicone Muffin Liners

Zero Waste: Silicone Muffin Liners

In my quest to eliminate all disposables from my home, I bought a set of twenty-four silicone cupcake liners, which are absolutely awesome. I use them all the time. [Every weekend, to be exact, because I bake vegan banana muffins every Friday night for Saturday breakfast.]

[Strictly speaking, cupcake liners aren’t necessary for muffins – but I also use them for cupcakes at birthdays and other celebrations.]

These silicone liners have actually replaced my muffin tin [which was scratched and rusted and had to be thrown out anyway], because they stand on their own. I just space them out on a cookie tray, fill them up, and bake them. Easy-peasy.

And they are so cute!

I even baked some muffins for my new neighbor and delivered them to her in these liners [briefly mentioning that the liners were reusable so she wouldn’t toss them], because I didn’t have anything else!

Only downside is hand washing them every weekend. But a quick scrub with my dish soap block and pot scrubber does the trick.

I ordered the set on Amazon a year or so ago. [Maybe not the most ethical purchasing option, I realize, but I’m not sure what a more ethical option would be.] Nowadays, I try to buy all my zero waste essentials from zero waste shops. I like to support the businesses of these like-minded individuals and by supporting zero waste shops, I am hoping to see more and more of these types of stores open around the country [and world] in the future. Unfortunately, none of them carry these silicone liners at the moment.

Speaking of zero waste shops, here are my favorites. [And while they don’t have cupcake liners, they have a TON of other great swap essentials, so check them out!]

Well Earth Goods

Package Free Shop

Wild Minimalist

Zero Waste Store

Lush

Many of these that I’ve listed have brick and mortar stores, as well as online purchasing options.

There are plenty more eco-friendly shops out there that I am looking forward to trying some day. But for now, the list above provides me with everything I need.

Maybe at a later date I’ll go into more details about these shops.

For now, how is everyone’s zero waste journey going? What have you been swapping??

❤️

Karis

[Nearly] Zero Waste Kitchen: Three Ways to Use Vegetable Scraps

[Nearly] Zero Waste Kitchen: Three Ways to Use Vegetable Scraps

Composting is fundamental to a zero waste lifestyle, but my goal is to use as much of the vegetable as possible before tossing what’s left into the compost bin.

So, today I’m sharing three ways I like to use vegetable “scraps” that usually get tossed.

Pictured above is a recent Misfits Market produce delivery that I received. In order to create as little waste as possible, I used the broccoli stems for a salad, carrot tops for pesto, and the rest of the scraps for vegetable broth.

Broccoli Stem Salad

Poor broccoli stems. People like them even less than they like the rest of the vegetable.

☹️

Broccoli stems are perfectly edible, but they often get thrown out because they are woody and not as appetizing. Nowadays I will steam them with the rest of the broccoli, but [don’t tell anyone] I used to compost them because I don’t like them as much as the florets.

Then a girlfriend of mine told me about spiralizing the stem and using it in a salad! What a great idea!

All you need is a spiralizer to add broccoli [a superfood, by the way] to your salad. I have a small handheld spiralizer that I use frequently for small veggies [pictured below].

And a countertop spiralizer, which I don’t use as often, but it perfect for spiralizing big things like heads of cabbage, sweet potatoes, etc.

Carrot Top Pesto

I love making my own pesto! Besides being delicious and a great sauce or dip, pesto can be infinitely customized. I make mine vegan and throw in whatever greens I have. A traditional pesto uses basil; however, [nearly] any green will work.

Vegan kale and carrot top pesto

When I have carrots, I throw the green tops into pesto along with whatever other greens I’m using, usually basil, kale, spinach, or a mixture of them.

[Side note: if you buy your carrots without the tops, likely someone else is throwing them into the garbage, so try to buy carrots in their full form.]

Vegetable Broth

My produce order produced a lot of scraps – the ends of the zucchini and green beans, the leaves of the cauliflower, carrot peels, Brussels sprout stubs, etc. I take all of these loose ends and save them in a reusable bag in my freezer.

When the bag is full, I pour it all in my stock pot and simmer for…as long as I can. Then strain, pour in jars, and save in the fridge.

This is a no-brainer, but it still took me until recently to get into the habit of saving my scraps for vegetable broth. Now, I always have either some jars of broth in the fridge or a stash of scraps in my freezer.

👍

Anyway, hopefully these are some ideas to help you reduce waste! Any one else have creative ways to use vegetable scraps??

🥕 🥕 🥕

Karis

Zero Waste: Composting [my limited experience and two cents]

Zero Waste: Composting [my limited experience and two cents]

If you are considering going zero waste [or even just reducing your waste a little] you’ll want to start with composting. It is the most basic, first step in reducing waste since we all eat food and [in America] so much of our food ends up in landfills where it releases methane gas which is even worse for the environment than carbon dioxide.

Instead, we could be putting all those food scraps back into the ground to feed soil and gardens and farms and…just plain old Mother Earth.

Compost methods

I’ve composted in two settings: wooded lot that I owned in an unincorporated suburb of Chicago, and a house that I’m renting with lots of close neighbors in a small rural town. I also researched composting in the city of Chicago because I was planning to live there.

Turns out the old saying is true – even for composting. If you’ve got the will, you can find a way.

In the ground

When I began composting, my house was on a half-acre lot surrounded by forest preserve. There were no regulations about composting, so we bought a used compost bin and put it on the edge of our property.

This is exactly what ours looked like.

This compost bin doesn’t have a bottom, so it mixes right in with the soil. [Another alternative for this type of composting would be to simply construct a frame for your compost pile out of scrap wood or pallets. You can find tutorials online.]

Everyday, our kitchen scraps [excluding meat, dairy, and bones] would go into a bowl in our freezer. When the bowl was full we would dump it in the compost bin.

Easy-peasy.

When the weather was warm, the compost would break down without even having to turn it, and every spring we would take plenty of rich compost from the bottom of the bin and use it in our garden beds.

In the course of the four years that we lived in that home, we filled two of these large 90+ gallon compost bins – but we eat a lot of fresh fruit and vegetables, so we have a lot of scraps.

[I’ll be posting later about my favorite way to get the most out of scraps before composting them.]

This, it would seem, is the easiest option.

In a container

Now that we’ve moved to a traditional neighborhood with lots of neighbors in close proximity [and not much privacy or woods], putting a massive, unsightly [not to mention smelly and fly-infested] compost bin in the backyard didn’t seem like the greatest idea. Instead, I decided to buy a fancy rotating composter.

Oooh. So pretty.

This composter is nice because the rotating makes mixing easy. BUT, it is smaller than our previous bin and we filled it in two months during the winter, which is when composting slows waaaaaay dowwwn. So anyway, we introduced compost bin #2, which is just a Rubbermaid container. [I’m hoping we won’t need another now that the weather is warming up.]

These composting methods require a little more attention, needing to be mixed every so often in order to keep the right ratio of water, air, green, and brown matter, but it’s not complicated.

There are other ways, as well, tho I’ve never tried them and I’m not well versed in them.

With curbside pickup service

When we were considering moving to downtown Chicago, I knew I most likely wouldn’t have any yard for composting, so I began looking for alternatives. There are in-home composting options available [which I’ll mention below], but we wouldn’t have a way to use our compost even if we could produce it, and that’s when I discovered compost pickup services. Of course, not all cities and few rural areas will have a service like this, but if you live in a high rise in a big city, you can probably find one. Then you collect your compost and leave it out for weekly pick up – just like the garbage.

For collecting compost, I recommend this counter-top compost bin that we recently upgraded [the bowl in the freezer was a hassle to thaw].

This collection bin has replaceable charcoal filter on the top to allow air flow and trap bad odors.

Vermicomposting

Vermicomposting is also good for apartments or homes without yards because worms do the work of breaking down the scraps. I have not tried it…yet! I hope to someday have an in-home vermicomposter.

If you compost with worms, tell me all about it!!

Bokashi

I just heard about bokashi for the first time recently and I am intrigued! Apparently, it breaks down scraps using a certain bacteria which causes fermentation to break down the food [and other] matter. I’ll have to look more into this method.

If you have experience with bokashi, please let me know!!

What to compost

You can compost a lot more than just food scraps, which is fabulous for cutting down waste. Dryer lint, brown bags, human hair, nail clippings, q-tips [obviously not the plastic kind], and 100% cotton textiles can be composted. [There’s a lot more too! Look around online for more unusual things people compost.]

Anyway, composting isn’t as daunting as it may seem and like most things, it’s best to just jump in and go for it.

🌱 🌱 🌱

Karis

[Nearly] Zero Waste Kitchen: Sourdough Discard Crackers

[Nearly] Zero Waste Kitchen: Sourdough Discard Crackers

Now that I’ve been on the sourdough bandwagon for a while, I’ve been anxious to find creative uses for the extra sourdough starter I accumulate from feeding it daily [usually called “discard”]. There are lots of ideas out there, but they never interested me much until I stumbled upon the easiest, simplest sourdough cracker recipe EVER. And so, of course, I want to share it with you, on this most special Super Bowl Sunday, because it is a great snack for a game day, for a party day…or for any day really.

Now, I know what you may be thinking, I’ve seen millions of these sourdough cracker recipes! And I totally agree with you. They are all over the interwebs right now – but, I promise you, this is the simplest recipe. I know because after I found this recipe, I lost it and it took me forever to find it again. Every other recipe I looked at had other ingredients like butter, rye flour,sesame seeds, etc. I couldn’t find a single other recipe that just had four ingredients: flour [any kind], sourdough starter, oil, and salt.

So, if you’re going to a party [which you SHOULDN’T BE – ahem, Covid!] or if you’re throwing a party [don’t even THINK about it!], or you’re doing like us, and pretending it’s a special occasion while sitting in your own living room watching the game by yourself, these crackers make a great snack.

If you don’t currently have a sourdough starter, get yourself one! It took me a long time to find one [without ordering one online], but I realize now that I have lots of friends who have them and all I had to do was ask! Sourdough bread is so delicious and simple to make [albeit time consuming] and only requires a few simple ingredients and is quite impressive to serve at your next family get together [after COVID, of course!].

I mean, who doesn’t want to say that they baked a sourdough boule [which is just a fancy French word for “ball”]?

I’ve even started attempting fancy scoring patterns. My latest attempt:

Eh, needs some work….

Anyway, on to the crackers.

The sourdough discard cracker recipe [which seems too simple to even qualify as a “recipe”] comes from Bon Appetit [You can find the original here.]. But I will summarize and add my own tips and modifications for you.

First, combine 1 cup flour [any kind] with 1 cup sourdough starter [ripe or not], 1/4 cup olive oil, and 1/4 tsp salt [or more]. I have used all purpose flour, whole wheat flour and a mix of the two – all with the same delicious results.

Next, mix until the dough comes together and isn’t sticky to the touch. After a few seconds of mixing, the dough becomes smooth and elastic. It isn’t dry, but you can touch it with your finger and it’s comes away clean. This far, every time I’ve made these crackers I have had to add a little bit more flour [just a sprinkle] to get the right consistency.

Then, take a portion [I usually pull about a fifth] and roll it out on a silicone baking mat [or parchment paper if you don’t have a reusable baking mat – but then go buy one!]. No flour needed. The dough should not be sticky [thanks to the oil]. I don’t even flour my rolling pin. The key: roll it thin. I roll mine so thin that I can almost see through them. This is important if you want a crispy cracker [and, I mean, who really wants a chewy cracker???].

Next, cut into crackers shapes with a pizza roller, prick each cracker with a fork, and top with salt and/or seasonings. I use a flaky salt or garlic salt.

Finally, pop in a 350° oven for roughly 15 minutes. I put mine in for exactly 16 minutes, but every oven is different, so some experimentation may be necessary. You’ll know when they are done because they will all turn a uniform [and lovely] golden brown.

[Obviously, repeat the last three steps until you’ve used up all the dough.]

👍

This recipe yields at least five dozen crackers when I make it [usually closer to 100], but I’m not much of a perfectionist, so the sizes are all different and sometimes wonky…so, I don’t promise a certain amount of crackers. BUT I do promise that they will be yummy!

Different colors indicating different baking times, as I experimented with getting the perfect crispy cracker.

Great dips include hummus, guacamole, salsa, peanut butter – or just eat plain, by the handful!

Anyway, I hope you give it a try!

Happy snacking!

😋😋😋

Karis

A Month of Misfits Market [saving the planet by saving produce]

A Month of Misfits Market [saving the planet by saving produce]

Shortly after moving to our small town in southern Illinois last November, I signed up for Misfits Market, a weekly produce delivery service. Here are my thoughts for those considering using this service.

What is Misfits Market?

Misfits Market rescues organic produce that isn’t fit for grocery stores and ships them at a discounted box rate to customers around the country.

“Every box of Misfits produce you order benefits farmers, helps prevent food waste, and ultimately helps save our environment.”

Misfitsmarket.com

Sounded really good to me, almost too good to be true, so I was a little skeptical. I have heard negative reviews of other similar programs promising to “rescue” produce, but now that I’ve received several orders, I believe that a lot of this produce is, in fact, rescued. I’ve found banana-shaped cucumbers, oranges the size of my head, perfectly round sweet potatoes, plenty of bruised [but perfectly edible] apples, and extra large lemons like this one here:

Of course, a lot of the produce seems to be perfectly normal and fit for any grocery retailer, but then again, I’m not even close to a professional in this area.

They also ship the produce in eco-friendly packaging, which you can read more about here.

[This is one of those businesses that I would like to visit so I can really see with my own eyes what’s happening and, more importantly, how it’s happening. Because if this company is really doing what it says it is, then it’s fantastic and everyone should get onboard!]

Why Misfits Market?

Our town has two grocery stores: a Walmart Supercenter and a local grocer which is mostly salvaged and overstocked goods. Neither option is great for produce on a normal day, but I’m used to our CSA produce from our local farm, so I really wanted to find something comparable down here. Shouldn’t be hard, since this is a farming community…or so I thought. I began searching for local farmers markets or CSAs in the area, but couldn’t find anything open or running during the winter season. I did, however, discover Misfits Market.

As with everything, there are pros and cons. I prefer not to have anything shipped if I can pick it up myself and I have advocated repeatedly for eating local produce, so…I am definitely compromising a little bit. However, eating fresh, organic produce from sources I can trust is my number one priority. And I am committed to shop local for all of our other needs, like pantry items, dry goods, etc.

How does Misfits Market work?

Currently on Misfits Market, there were two sizes of weekly boxes. I chose the larger [called “Madness”] for $35 per week. The box comes with fourteen types of produce, 2-4 portions each. [The smaller box is called “Mischief” and has 12 types of produce, 1-2 portions of each for $22.] The price doesn’t include taxes and shipping and I have the option of adding additional items for extra cost from the “market,” which I have always done because I LOVE Brussels sprouts. So with my add-ons, I have spent $45-50 per week on the box.

Each week, I have a window of two days to make selections based on what is currently being rescued from farms around the country. The items are available on a first come, first served basis. I literally have an alarm set on my phone. I make my selections on Saturday and my box is delivered on the following Friday [I could choose my delivery day from a list of three or four options].

Today was my delivery day, and here is what my box contained.

Looks a lot like my CSA box, doesn’t it? [Except for those pesky stickers on all the fruit and several things still wrapped in plastic.]

What I Like

Overall, I am really happy with the service. My box always arrives on time, it is priced really well, I get to choose the items I want, the food is in season, the produce is all organic, and it comes straight to my door [which is super convenient – I’m a mom of four, don’t forget!]. I can also skip a week, pause my shipments, or opt for bi-weekly delivery any time I want. And my experience with customer service has been terrific [more on that below].

As I said before, I would prefer to find local produce, so when the summer comes I will likely pause my deliveries and return to my absolute favorite store: the farmers market! But, in this case, shipped produce is better than my alternatives.

What I Don’t Like

I’ve had a few problems with things missing from my box. But it is very easy to contact them about a missing item [quick form online] and I was issued a credit within twenty-four hours [no hassle and no fuss].

I’m not complaining or trying to discourage anyone from using this service, but be warned – the quantities can be a little strange. One week I ordered Brussels sprouts and I found six tiny sprouts at the bottom of my box. Another time I ordered spaghetti squash and received four ginormous squashes. Sometimes I get two oranges, and other times I get six. When I ordered lettuce, I got TONS of lettuce. You never know. It’s not really a problem, it’s just unexpected. [Part of the fun, I guess?]

Sometimes the produce is not in great shape. I avoid ordering leafy greens [especially delicate ones like butter lettuce] because they have often arrived soggy and brown. Of course, this is part of the issue with shipping produce, and it is to be expected. Not a big enough problem for me to stop using the service.

Overall, I am really happy with Misfits Market. I recommend it, but I also recommend hitting up local farmers markets, looking for CSAs in your area, and making the decision that is best for you. If you don’t have a local option available to you, then this is a good way to get organic produce for your family AND help cut down on food waste [which is a major problem here in America].

So, it’s a win-win! Eat produce and save the planet!

🥦🍐🥬

Karis