[Nearly] Zero Waste Kitchen: Vegetable Soup

[Nearly] Zero Waste Kitchen: Vegetable Soup

Before I get started talking about my highly customizable, completely zero waste, delicious and hearty vegetable soup, I need to admit a few things…

First, I am not a chef. I would barely qualify as a cook if it weren’t for the fact that I now find myself in the unfortunate position of needing to cook…A LOT. I don’t know if the sheer quantity of meals I prepare is enough to call me a cook, but I still don’t feel like one. In fact, I’ve always hated cooking.

“Baking have I loved and cooking have I hated.” [Good ol’ scripture reference from the religion of my youth.]

Anyway, to be fair, I’ve become a decent cook. I can prepare a whole meal without needing to consult allrecipes.com and I very frequently “wing it” with good results. I’ve even found myself creating my own recipes!!! This is totally out of character for me – but, as they say, necessity is the mother of invention. [At least, I think that’s a saying…]

🤷‍♀️

Secondly, this is not a recipe.

Sorry about that.

This is more about encouraging everyone to look through the fridge or the pantry and find what’s just hanging around unused and forgotten and throwing it all in a big pot with some water and seeing what happens.

It’s an adventure really. And I love adventure!

So, let’s get on with it.

Why Vegetable Soup is AWESOME

Vegetable soup is a staple in my home for many reasons:

1. It is versatile. I have never met a vegetable that didn’t like to be in a vegetable soup. I also love to add quinoa, lentils or rice in for fun sometimes.

2. It is zero waste. I never have to add the ingredients for this soup to my shopping list because the whole point is to use up what I have lying around. And, believe me, I’ve thrown some random things in my vegetable soups [all edible, I assure you].

3. It is easy to make ahead and reheat. In fact, I usually make this while my kids have their quiet time so that I don’t have to worry about four staving children nagging me for dinner. I also always make this when my husband works late because I can make it earlier in the day so dinner time is a breeze. Soup is also great for freezing.

4. My kids love it. I love it too. [My husband is iffy on it, but that’s only because he doesn’t believe that anything without meat or cheese is real food, so don’t listen to him.] In fact, my vegetable soup is the only thing that I can count on my picky two-year-old consistently eating.

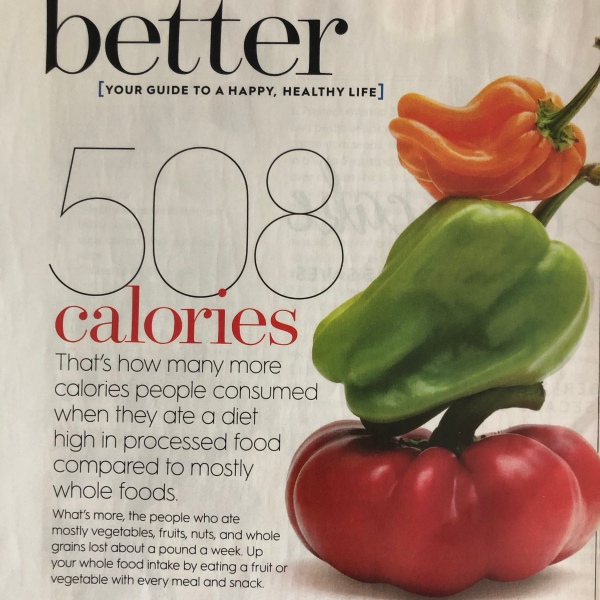
5. It is SO GOOD FOR YOU! I frequently encourage my personal training clients to up their vegetable intake by trying to have two different types of vegetables at every meal. This soup could have DOZENS! Most people are not getting enough vegetables, so this soup can really help [and a salad at lunch goes a long way too].

How to Make the Vegetable Soup

Ok, so I already admitted that this is not a recipe, but I will walk you through the basics.

Step 1: Find and chop all the vegetables you want to use. Literally any and all vegetables will do.

Step 2: Cook them in a stock pot with a little oil starting with the hardest vegetables and then moving to the softest. [Or just throw them all in at once and move to step three. Feel free to be lazy with it. It’s all going to simmer in the end anyway.]

Step 3: Add water to cover and bring to a boil.

Step 4: Add anything else like beans, potatoes, quinoa, rice, sweet potatoes, other vegetables you might have forgotten, anything else you found lying around in the fridge like a leftover jar of pasta sauce, etc.

Step 5: Let boil as long as is needed for everything to soften then let it simmer for…as long as you want. Or take it off the heat and let the flavors meld. Or serve it up right away. Up to you.

Note: always taste and season as you go. May need some salt. Maybe some pepper. Maybe some chili powder. Maybe some garlic. Maybe some onion powder.

[Again, this is not a recipe.]

This is literally how I’ve made soup once a week for the past year and it has always been delicious.

…but it clearly doesn’t always look appetizing…

Pictured above is a corn, onion, celery, potato, quinoa soup – which turned into more of a stew cuz that quinoa really soaks up the liquid. Very hearty and delicious.

Here is a carrot, onion, corn, green bean, and chickpea soup.

Now this soup had A LOT in it: carrot, onion, tomato, sweet potato, black beans, quinoa, kale, and a few other things I can’t remember…

Ok, in this one I added shredded chicken, BUT IT WAS GOING BAD, I swear! If you’re a meat eater then it’s totally fine to add some meat! And top it with cheese! [But really, I’d prefer you not because a plant-based diet is better for you and the planet.]

Just had to throw that in there.

🤷‍♀️

Anyway, vegetables. Eat them. Throw them in a pot with some water and salt. Delicious.

That’s all I’m trying to say. 😁

🥦🍅🥕

Karis

A Week of my [Nearly] Vegetable-Only Diet

A Week of my [Nearly] Vegetable-Only Diet

As promised, I have tracked my food for one week and am going to show you what my meals look like on my plant-based, no processed, mostly vegetable diet.

But first…

The Problem

Let me tell you a story.

Yesterday, I was in the Panera drive-thru ordering three chocolate chip cookies for my kids [it was flu shot day], and the employee tells me that it is cheaper to buy four cookies than it is to buy three. So, of course, I order four cookies.

The problem is, I only have three kids who are old enough to eat cookies. I’m not sure what I was expecting to happen to the fourth cookie…

But I definitely ate it, despite telling myself that it could just sit there uneaten all day.

That cookie was 440 calories!!!! That is more than a THIRD of my total caloric goal FOR THE DAY! ONE COOKIE!

No wonder so many of us have trouble managing our weight.

So that brings me to the veggie diet.

The [Nearly] Vegetable-Only Diet

Some things I need to mention:

1. I am not pretending to be a dietician or nutritionist.

2. I aim for between 1,100-1,200 calories per day, which is less than I need because I am trying to lose weight. But I always eat when I am hungry and never eat less than 1,000 calories. This is also a CARB HEAVY diet.

3. There are some foods I eat that I don’t track such as some raw vegetables that have very little caloric value and I don’t measure and track the olive oil I use for cooking. So my total calorie amount is higher than what my tracker shows. [I didn’t take pictures of my snacks which varied and usually made up about 300 calories each day.]

4. I exercise every day – usually twice, sometimes three times…so this helps me with weight loss. [Hence, the large amount of carbs I eat.]

5. This is baby weight.

Ok, so here we go:

Day 1

Brown rice, black beans, peppers and onions for dinner. 100% vegan and made from scratch. 👍🏻

Day 2

Eggs with sweet potato and black bean hash for dinner. Otherwise, vegan and made from scratch.

Day 3

Egg for lunch. Spaghetti squash with homemade tomato sauce for dinner. 👍🏻

Day 4

A random assortment of vegetables for dinner. 100% vegan and made from scratch. 👍🏻

Day 5

Grilled chicken with roasted Brussels sprouts, asparagus, and squash.

Day 6

Vegetable frittata for lunch [made by Brett!!], and homemade vegetable stew for dinner. 👍🏻

Day 7

Leftover sweet potato and black bean hash, with vegan Parmesan. 100% vegan whole foods made from scratch. 👍🏻

Before and After

I lost five pounds and I never went hungry.

As you can see, I like oatmeal for breakfast and salad for lunch. What can I say? I like routine.

One week postpartum and earlier today.

Here is our family photo a week after Nora was born:

And here is me with the kids tonight before going out trick-or-treating:

[By the way, how adorable are these kids?!?]

And the week is over just in time to enjoy Halloween!

Now, it’s time to go eat some candy!

Confession: I definitely fall into the 44% category!

Who is with me?

🍭 🍭 🍭

Karis

Homemade [Low Sugar, No Pectin] Strawberry Jam

Homemade [Low Sugar, No Pectin] Strawberry Jam

Two years ago, I read a small sidebar – maybe three or four sentences – in Martha Stewart Living Magazine about how she makes a pectin-free strawberry jam. It sounded so simple that I immediately bought some strawberries and gave it a try. I’ve been happily making my own jam ever since.

[Thanks, Martha!]

Since then, I’ve experimented with reducing the sugar and adjusting the steps to suit my time constraints and personal preferences until I can now say that I have created an even simpler and healthier way of making strawberry jam!

[Sorry, Martha, it’s true.]

So, here’s all you need to do.

1. Hull and rinse strawberries. [I usually quarter them, but that is not necessary.]

2. Put berries in a big bowl and mix with half a cup of sugar per one pound of strawberries [Martha’s recipe called for double the sugar] and juice of one lemon.

Side note: I’ve tried even less sugar and even no sugar recipes but the jam always tastes really tart and doesn’t thicken the way this version does.

3. Cover and refrigerate overnight. [Martha never specified how many hours to refrigerate them so I just make the jam sometime the next day.]

4. Heat on the stove in a big stock pot until sugar is dissolved. This doesn’t take long – maybe 10 minutes.

5. Remove the berries and boil the remaining juice until it reaches 221°. This takes longer – maybe 40 minutes to one hour, depending on how much jam you are making.

6. Blend [or mash] berries and add back to the juice. [You could also leave the strawberries whole.] Boil for five more minutes.

7. Pour into sterilized jars. Let cool on the counter then refrigerate or freeze.

The jam thickens as it cools and even more once it’s in the fridge, but it never gets as thick as a jam made with pectin. Still, it works perfectly for PBJ or as a sauce for dessert [like cheesecake or angel food cake or vanilla ice cream] or a topping for toast.

To keep the cost down, I only make jam when strawberries are on sale. Today, I used seven pounds of strawberries and three cups of sugar and made roughly two quarts of jam – for about $7.

I’m not sure if that’s a savings, but it is zero waste AND zero high fructose corn syrup!

So, that’s a win in my book.

🍓 🍓 🍓

Karis

Homemade croutons

Homemade croutons

When I’m reaching the end of my homemade bread loaves, I usually have some dried ends hanging around because of the shape of my loaf pans. Rather than let these go to waste, I use them to make croutons.

I originally got the idea from back in the day when I worked for Panera. Did you know that they make their own croutons out of their freshly baked bread? Well, at least that’s how they did it ten years ago…

Anyway, nowadays I do the same thing when I’m looking for ways to use the bread before it goes bad.

It’s SO simple and a great zero waste option if you love croutons as much as I do.

How to make your own croutons:

  1. Cube the bread.
  2. Add enough oil and seasonings to coat lightly. [I use the same seasoning mix I use for my homemade salad dressing here, or you could use regular Italian seasoning.]
  3. Spread on a baking sheet and bake at 450° for roughly 8 minutes, shaking the tray once to stir. [Time will depend on how dry the bread is to begin with, so watch closely.]
  4. Enjoy in soups or salads or, as my kids like to have them, as a crunchy snack.

For dinner tonight I had day old bread that needed to be used up, so I made grilled cheese sandwiches and used the ends of the loaf to make these croutons to top squash soup which my Auntie Paula had given us.

Mmm-mmm. Delicious.

Karis